

診察時間
午前9:00-12:00
午後15:00-18:00
手術時間12:00-15:00
水曜・日曜午後休診

浅上腕動脈(superficial brachial a.)軸上皮弁は、肘周囲〜前腕の広範な欠損に対し、機能と被覆を同時に満たすために用いる軸上皮弁
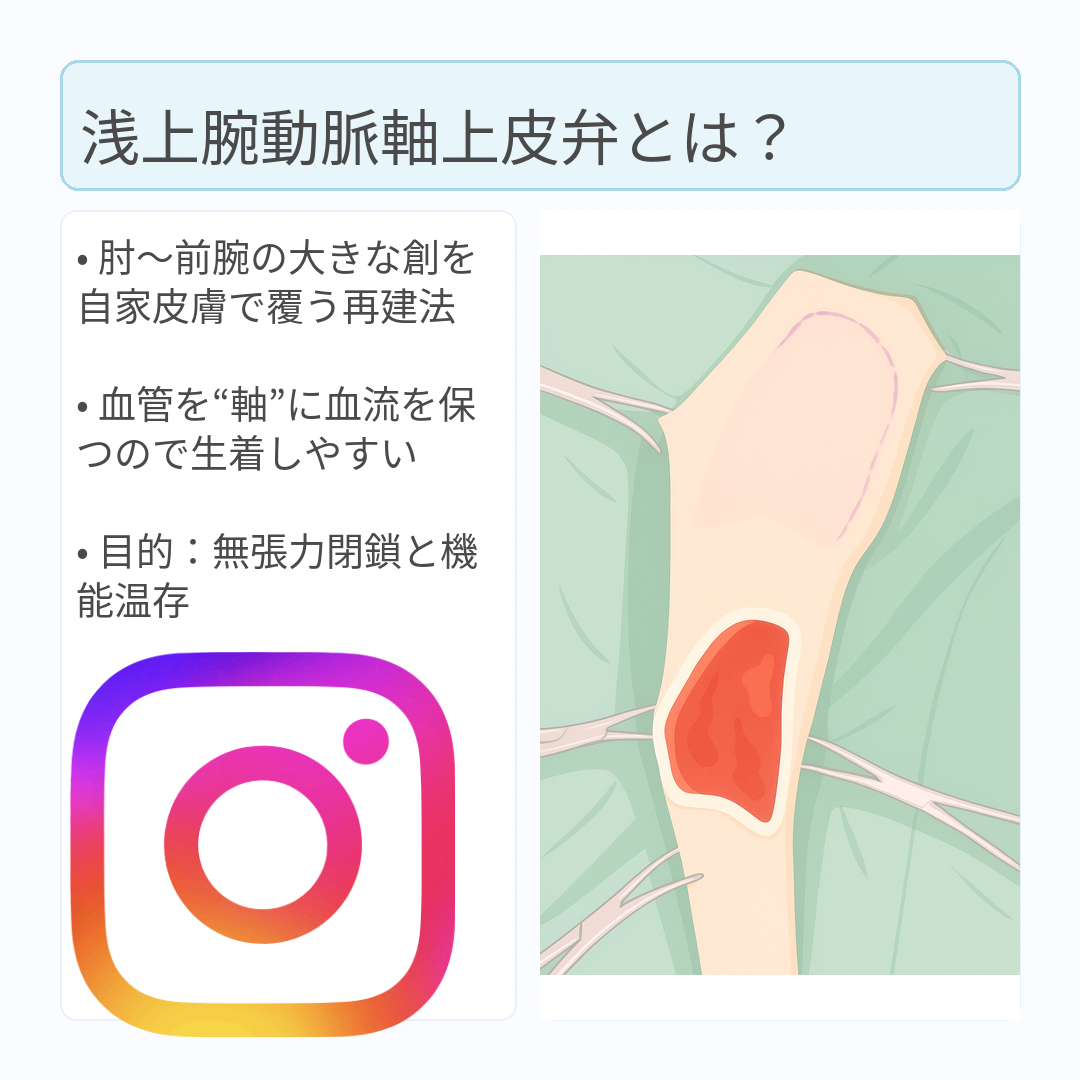
浅上腕動脈(superficial brachial a.)軸上皮弁は、肘周囲〜前腕の広範な欠損に対し、機能と被覆を同時に満たすために用いる軸上皮弁(Axial Pattern Flap; APF)です。ここでは臨床でそのまま使えるように、解剖・ランドマーク→デザイン→挙上→移行・縫合→固定/術後までを一気通貫で整理します。
もくじ
① 適応と到達範囲(目安)
- 適応:肘頭周囲〜前腕(前内側〜前面)の外傷・腫瘍切除後欠損で、単純縫縮や局所皮弁・植皮では機能温存が難しい症例。
- 到達範囲:欠損の下縁が手根の2–3 cm近位までカバー可能。皮弁長はおよそ14–19 cm(個体差あり)。
- 特性:ほかのAPFに比べやや脆弱で、辺縁壊死・離開・漿腫などの合併症は相対的に多いが、多くは追加大手術なく最終治癒に至る。
② 血管解剖とランドマーク
- 供血:上腕動脈から分岐する浅上腕動脈の皮膚枝が中軸。肘の屈側面・背側1/3付近を中心に、上腕骨骨幹に沿って近位へ走行。
- 皮膚上の基準点:①肘屈側面の背側1/3(pivot)/②そこから上腕骨大結節へ向かう帯状領域(2本の平行線)/③受血側は前腕前内側〜前面。
- 静脈:橈側皮静脈(cephalic v.)は動脈の外側を並走。損傷・結紮に注意。
③ 術前計画・体位・マーキング
- 体位:健側下の側臥位。患肢は前方牽引し、肩〜上腕〜肘〜前腕を広く露出。
- マーキング:肘屈側背側1/3を中心に、肘→上腕骨大結節へ平行2線で帯状に描く(皮弁幅=欠損幅+α)。
- 橋切開の計画:皮弁と欠損の間に健常皮膚が介在する場合はbridge incisionで連結予定を併記。
- 到達確認:必要に応じて近赤外ICGで血管走行・境界を術前評価。
④ 皮弁デザインのコツ
- 長さ:回転弧を見越して設定。過長は末梢壊死リスク。目安の中央値は約16 cm。
- 幅:欠損幅+数mm。基部は太く設計して血管茎の圧迫を回避。
- 毛流:受容床と合わせると段差・張力が減り仕上がりが良い。
- ドッグイヤー:初期は血流優先で温存し、必要に応じて二期整形。
⑤ 挙上(ディセクション)手順
- 切開:マーキングに沿い遠位→近位へ皮膚全層切開。血管茎近傍の電気メスは最小限。
- 層:皮下を厚めに付け、筋膜直上の疎性層で鈍的に展開(皮下血管網を温存)。
- 血管茎の確認:肘屈側背側1/3付近で浅上腕動脈皮枝を同定。橈側皮静脈は外側—不用意に結紮しない。
- 基部の扱い:過剥離は避け、屈曲・狭窄・ねじれを絶対回避。必要時に短距離だけ露出して走向確認。
- 可動性試験:ステイ縫合で把持し、受容床へ回転/前進させて到達と無張力性を確認。
- 橋切開:皮膚橋が障害ならbridge incisionを作成し通す。
⑥ 受容床の準備
- 壊死・感染組織は徹底デブリードマン。
- 深部は健常な出血面を確保し、ポケットや鋭角は除去。
- APFのため肉芽床は不要だが、死腔を最小化しておく。
⑦ 皮弁の移行(inset)と縫合
- 回転時の最終確認:茎のねじれ/屈曲がないか、肘屈曲位でもチェック。
- ドレーン:死腔が大きい場合は閉鎖吸引(低圧でも可)を基部〜受容床に1本。
- 縫合層:
- 皮下:3-0〜4-0 吸収糸で単純連続 or 連続埋没
- 皮膚:3-0 ナイロン/ポリプロで単純結節 or 皮内連続+支持縫合
- テンションコントロール:張力は基部側で逃がす。必要なら小切開や減張切開を併用。
⑧ 固定・包帯・鎮痛
- 固定:肘・手根の過屈曲を防ぐ副子固定(例:改良トーマス副子)。少なくとも7–14日は可動制限。
- 包帯:RJ包帯(必要によりスプリント併用)。末梢循環を毎日確認。
- 鎮痛:NSAIDs±オピオイド±区域麻酔の多モーダル。
⑨ 術後管理の要点(合併症予防)
- 浮腫・漿腫:過度な圧迫を避け、適切なドレーンと安静固定。
- 末梢壊死:過長・過緊張・茎屈曲が主因。蒼白や暗色化を認めたら減張・包帯調整。必要なら開放管理→二期閉鎖/分層植皮。
- 感染:創コンタミ度に応じ標準的周術期抗菌薬。リスク高例は延長投与。
- モニタリング:色調・温度・毛細管再充満・ピンプリック出血を48–72時間は高頻度チェック。
- ICG蛍光評価:血管同定・境界設定の補助として有用。
⑩ よくある落とし穴とコツ
- 遠位設計し過ぎ:安全域は「手根の2–3 cm近位」を目安に。
- 基部狭小:茎圧迫・ねじれ→基部を広く温存。
- 皮下が薄い:栄養枝損傷→皮下厚めで挙上。
- 早期過可動:肘屈曲で茎が折れる→副子固定の徹底。
⑪ 手順まとめ(オペ室用チェックリスト)
- 側臥位で広範囲準備。
- 肘屈側背側1/3を中心に肘→大結節へ平行2線を描く。
- 受容床をデブリードして出血面を整える。
- 遠位から切開、皮下厚めに鈍的剥離。浅上腕動脈皮枝と橈側皮静脈を温存。
- 可動性試験→必要ならbridge incision。
- 無張力でinset、ドレーン留置、二層閉鎖。
- 副子固定+RJ包帯、48–72 hは血行厳重チェック。
- 末梢トラブルは早期に減張・包帯調整。壊死は開放管理→二期閉鎖/植皮。
参考イメージ(差し替え可)
ワンポイント:設計は「基部を太く・皮下厚め・無張力」が合言葉。肘の屈伸で茎が折れやすいため、術後の固定と包帯管理が仕上がりを大きく左右します。
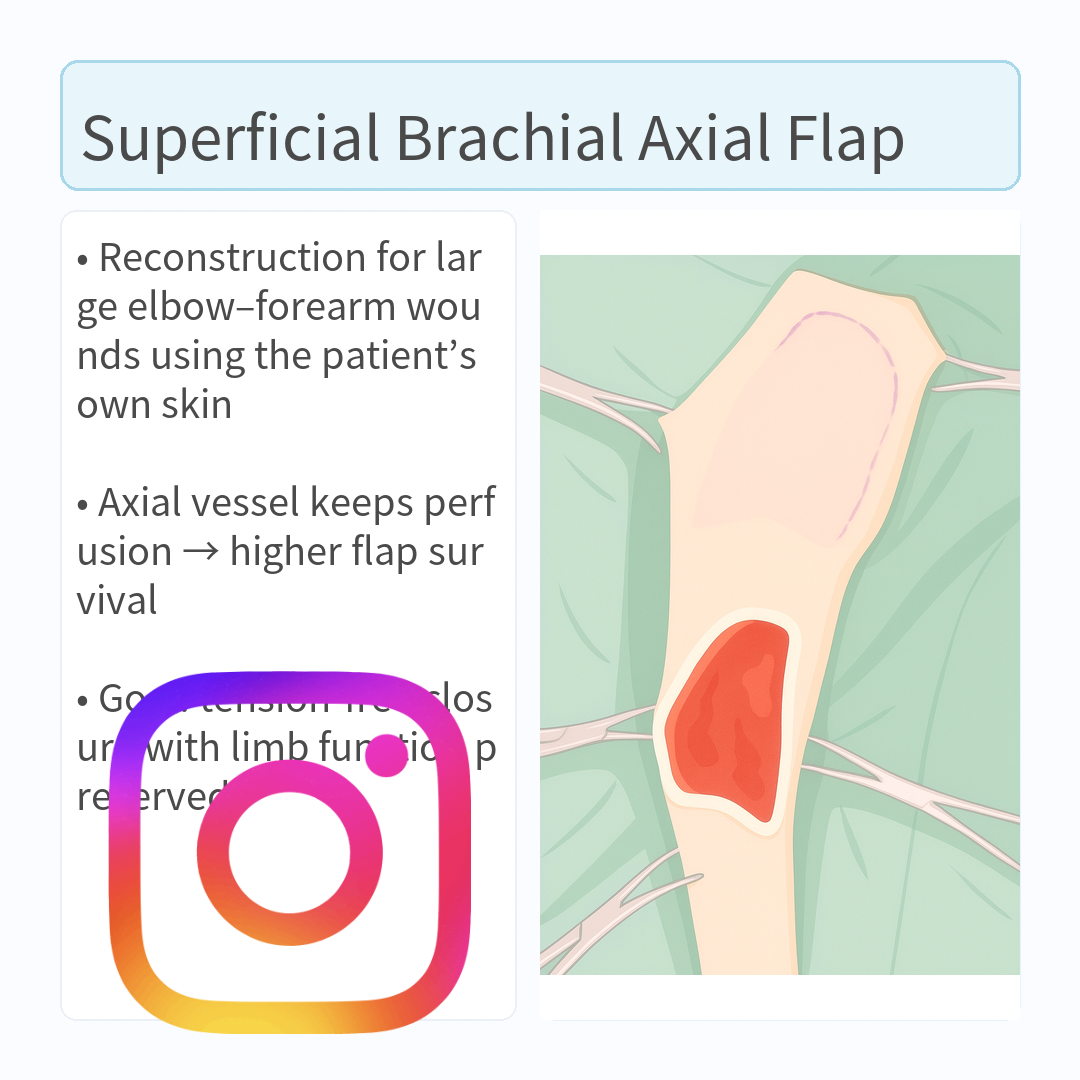
The superficial brachial artery axial pattern flap is used to close large defects around the elbow and forearm while preserving function and durable coverage. This guide walks through anatomy & landmarks → design → elevation → transfer/closure → immobilization & aftercare in a practical, OR-ready format.
Contents
1) Indications & Reach (rules of thumb)
- Indications: Large defects around the olecranon to forearm (anteromedial/anterior), after tumor wide excision or trauma, where primary closure, local flaps, or grafting would compromise function.
- Reach: Typically covers defects with the distal margin up to 2–3 cm proximal to the carpus. Flap length about 14–19 cm (individual variation).
- Trait: Slightly more fragile than some other APFs; marginal necrosis, dehiscence, seroma occur relatively often but most cases ultimately heal without major re-operation.
2) Vascular Anatomy & Landmarks
- Pedicle: Cutaneous branches of the superficial brachial artery (from the brachial a.). Pivot located around the dorsal third of the elbow flexural surface, with proximal course along the humeral shaft toward the greater tubercle.
- Skin landmarks: (1) Pivot at the dorsal third of the elbow flexural surface; (2) Two parallel lines drawn proximally toward the greater tubercle; (3) Recipient zone is the anteromedial/anterior forearm.
- Vein: The cephalic vein runs lateral to the artery—avoid injury or ligation during dissection.
3) Preop Planning, Position, Marking
- Position: Lateral recumbency with the sound side down; affected limb pulled forward to expose shoulder–brachium–elbow–forearm widely.
- Marking: Center on the dorsal third of the elbow flexural surface; draw a band-like flap with two parallel lines from the elbow toward the greater tubercle (flap width = defect width + small margin).
- Bridge incision: If intact skin lies between flap and defect, plan a bridge incision to tunnel the flap smoothly.
- Reach check: ICG near-infrared fluorescence can help map the pedicle and define safe borders when available.
4) Design Pearls
- Length: Include rotation arc; excessive length risks distal necrosis. A practical median is ~16 cm.
- Width: Defect width plus a few millimeters. Keep the base broad to avoid pedicle kinking/compression.
- Hair direction: Align with recipient bed to reduce step-offs and tension.
- Dog-ear: Preserve initially for perfusion; contour later if needed.
5) Elevation (Dissection) Steps
- Incision: Full-thickness along markings from distal → proximal. Use electrocautery sparingly near the pedicle.
- Plane: Keep a generous subcutis; bluntly dissect in the loose areolar plane just above fascia to preserve the subdermal plexus.
- Identify pedicle: Around the dorsal third of the elbow flexural surface. The cephalic vein runs lateral—do not ligate inadvertently.
- Handle the base: Avoid over-skeletonizing; prevent kinking/stricture/twist. Brief exposure only to confirm direction if necessary.
- Mobility test: Use stay sutures; rotate/advance to the bed to confirm reach and low tension.
- Bridge incision: Create when a skin bridge impedes a smooth path.
6) Prepare the Recipient Bed
- Thorough debridement of necrotic/contaminated tissue.
- Create a healthy bleeding surface; remove pockets and acute angles.
- Granulation bed is not required for APF, but minimize dead space.
7) Transfer (Inset) & Closure
- Final check during rotation: Ensure no twist/kink of the pedicle, including with the elbow flexed.
- Drain: If dead space is notable, place a closed-suction (low-pressure acceptable) drain from base to bed.
- Sutures:
- Subcuticular: 3-0/4-0 absorbable, simple running or buried continuous
- Skin: 3-0 nylon/polypropylene, simple interrupted or intradermal with support sutures
- Tension control: Unload at the base; add small relaxing incisions if needed.
8) Immobilization, Bandage, Analgesia
- Immobilization: Prevent excessive elbow/carpal flexion with a splint (e.g., modified Thomas) for 7–14 days.
- Bandage: Robert-Jones (RJ) bandage; add a splint if required. Check distal perfusion daily.
- Pain control: Multimodal—NSAIDs ± opioids ± regional techniques.
9) Post-op Management (avoid complications)
- Edema/seroma: Avoid over-compression; use appropriate drainage and strict rest.
- Distal necrosis: Often due to excessive length/tension or pedicle kinking. If pallor/mottling appears, reduce tension and adjust bandage; consider open management → delayed closure/partial-thickness graft if needed.
- Infection: Perioperative antibiotics according to contamination risk; extend in high-risk cases.
- Monitoring: Color, temperature, capillary refill, and pin-prick bleeding every few hours for the first 48–72 h.
- ICG assessment: Helpful adjunct for mapping and margin decisions.
10) Pitfalls & Tips
- Over-distal design: Treat 2–3 cm proximal to the carpus as the practical distal limit.
- Narrow base: Predisposes to compression/twist—keep the base broad.
- Too thin subcutis: Endangers perforators—elevate with a thick subcutis.
- Early excessive motion: Elbow flexion can bend the pedicle—enforce splinting.
11) OR Checklist
- Prep in lateral recumbency; expose widely.
- Mark pivot at dorsal third of elbow flexural surface; draw two parallels from elbow to greater tubercle.
- Debride recipient bed to a healthy bleeding surface.
- Incise distal→proximal; elevate with a thick subcutis; preserve the superficial brachial branches and cephalic vein.
- Mobility test; add bridge incision if needed.
- Inset without tension; place a drain; two-layer closure.
- Splint + RJ bandage; intensive perfusion checks for 48–72 h.
- Troubleshoot early; manage minor distal necrosis with open care → delayed closure/grafting.
Reference Images (replace as needed)
Pearl: Think “wide base, thick subcutis, low tension.” Post-op immobilization and bandage care strongly influence outcomes because the pedicle can bend during elbow flexion.
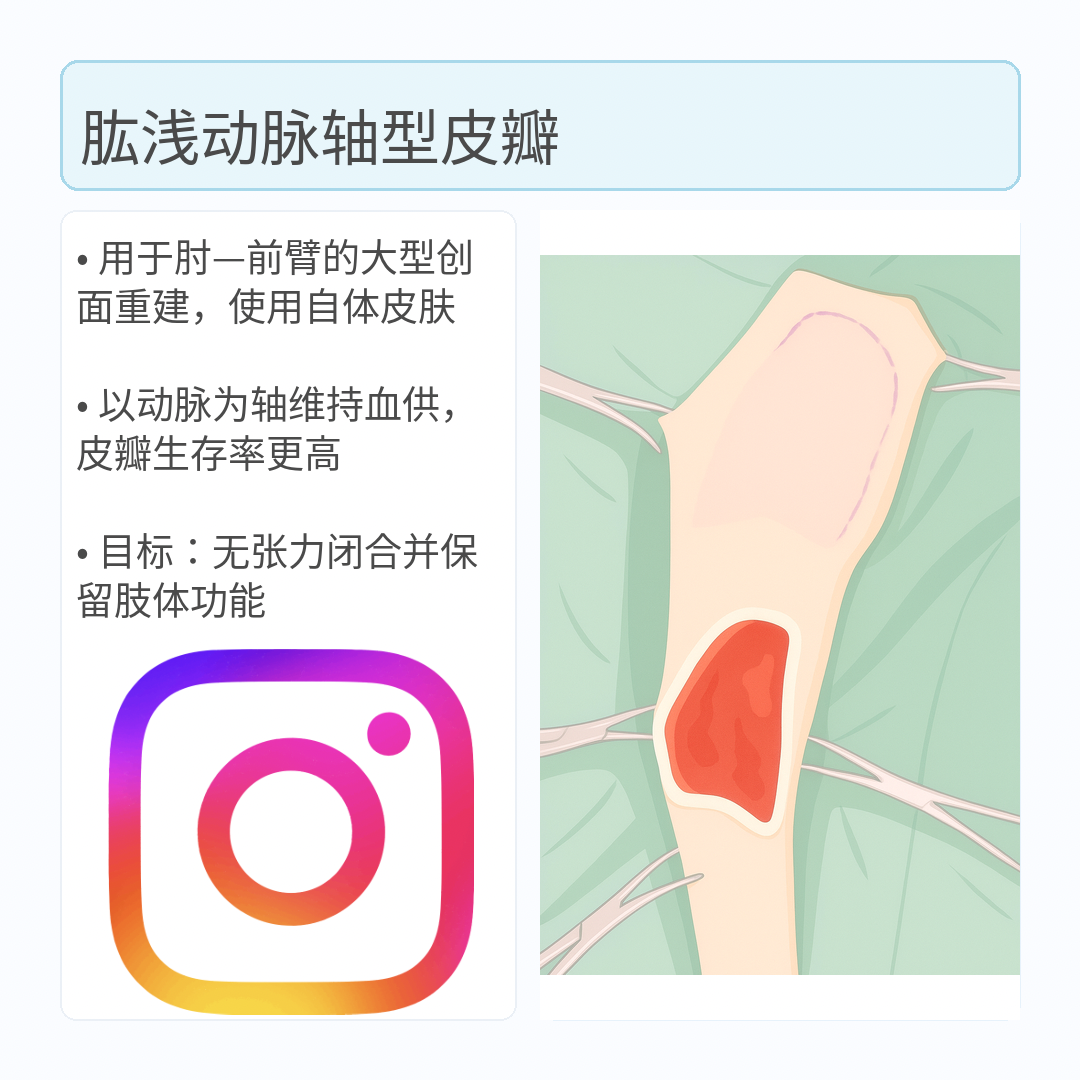
肱浅动脉(superficial brachial a.)轴型皮瓣适用于肘部至前臂的大面积缺损修复,可同时兼顾功能与稳定覆盖。本文按解剖与定位→设计→提瓣→转移/缝合→固定与术后的顺序,提供临床可直接应用的要点。
目录
① 适应证与覆盖范围(经验值)
- 适应证:肘后方至前臂(以前内侧与前面为主)的创伤或肿瘤广泛切除后缺损;若原位缝合/局部皮瓣/植皮难以兼顾功能,则优先考虑。
- 覆盖范围:通常可覆盖至腕关节近侧2–3 cm的缺损;皮瓣长度约14–19 cm(个体差异)。
- 特点:较部分其他轴型皮瓣更易发生边缘坏死、裂开、浆肿;但多数病例最终无需大型再手术即可愈合。
② 血管解剖与皮肤定位
- 血管蒂:来源于肱浅动脉的皮肤支。枢纽点位于肘部屈侧面的背侧1/3,自此沿肱骨干向近端至大结节方向行走。
- 皮肤标志:① 肘部屈侧面的背侧1/3为枢纽;② 自肘向肱骨大结节画出两条平行线形成带状皮瓣;③ 受区多为前臂前内侧/前面。
- 静脉:头静脉(cephalic v.)位于动脉外侧并行,提瓣时应注意保护,避免误结扎。
③ 术前计划、体位与标记
- 体位:健侧卧位;患肢前牵,充分暴露肩—肱—肘—前臂。
- 标记:以肘部屈侧背侧1/3为中心,自肘→肱骨大结节画出两条平行线的带状皮瓣(宽度=缺损宽度+余量)。
- 桥式切口:若皮瓣与缺损间有完整皮肤阻隔,预先计划桥式切口以便顺利通过。
- 到达评估:可用ICG近红外荧光技术辅助定位血管走行与安全边界。
④ 设计要点
- 长度:需考虑旋转弧;过长增加远端坏死风险。经验中位数约16 cm。
- 宽度:等于缺损宽度加少量余地;蒂部宜宽,避免扭曲/受压。
- 毛向:尽量与受区一致,减少台阶与张力。
- “狗耳”:初期可保留以保证灌注,必要时二期修整。
⑤ 提瓣(离断)步骤
- 切开:按标记自远端向近端全层切开;血管蒂附近尽量少用电凝。
- 层面:保留较厚的皮下组织;在筋膜表面的疏松层钝性分离,保护皮下血管网。
- 蒂的辨认:在肘屈侧背侧1/3附近找到肱浅动脉皮支;头静脉在外侧并行,注意保护。
- 蒂部处理:避免过度骨化;杜绝折叠/狭窄/扭转,必要时仅短距离显露以确认走向。
- 活动度测试:用牵拉缝线前送/旋转至受区,确认到达与低张力。
- 桥式切口:如皮肤桥影响通过,则建立桥式切口。
⑥ 受区准备
- 彻底清创坏死/污染组织。
- 确保健康的渗血面,消除死腔与锐角。
- 轴型皮瓣不需肉芽床,但应尽量减少死腔。
⑦ 皮瓣转移(inset)与缝合
- 旋转终检:确认蒂部无扭转/折曲,在肘关节屈曲位也应通畅。
- 引流:死腔较大时,于蒂部至受区置入闭式负压引流(低负压亦可)。
- 缝合:
- 皮下:3-0/4-0 可吸收线,单纯连续或埋闭连续
- 皮肤:3-0 尼龙/丙纤,单结或皮内连续+支持缝合
- 张力控制:优先在蒂部释放张力;必要时加小减张切口。
⑧ 固定、包扎与镇痛
- 固定:使用支具防止肘/腕过度屈曲(如改良Thomas支具),建议7–14天限制活动。
- 包扎:Robert-Jones(RJ)绷带,必要时联合夹板;每日检查远端灌注。
- 镇痛:多模式镇痛——NSAIDs ± 阿片类 ± 区域镇痛。
⑨ 术后管理要点(并发症预防)
- 水肿/浆肿:避免过度加压;使用合适引流并严格制动。
- 远端坏死:多因过长、过紧或蒂部折曲所致。若见苍白/斑驳,需立即减张并调整包扎;必要时采取开放处理→延期缝合/分层植皮。
- 感染:按污染程度给予围手术期抗生素;高风险病例延长用药。
- 监测:颜色、温度、毛细血管再充盈、针刺出血在术后48–72小时内需高频评估。
- ICG评估:可辅助勾画血管与安全边界。
⑩ 常见陷阱与技巧
- 设计过远端:将腕关节近侧2–3 cm作为实际远端极限。
- 蒂部过窄:易受压/扭转——保持宽蒂。
- 皮下过薄:危及穿支——以较厚皮下提瓣。
- 过早大幅活动:肘屈可折弯蒂部——务必支具固定。
⑪ 手术清单(OR Checklist)
- 健侧卧位充分准备与铺巾。
- 以肘屈侧背侧1/3为枢纽,自肘→肱骨大结节画两条平行线。
- 受区彻底清创至健康渗血面。
- 自远端向近端切开;以较厚皮下提瓣;保护肱浅动脉皮支与头静脉。
- 评估活动度;必要时加桥式切口。
- 无张力安置皮瓣;置引流;两层缝合。
- 支具+RJ绷带;术后48–72小时密切观察灌注。
- 早期处理小范围远端坏死:开放→延期缝合/植皮。
参考图片(可替换)
要点:牢记“宽蒂、厚皮下、低张力”。由于肘屈时蒂易被折曲,术后固定与包扎管理对结局影响极大。